Simple, Authentic Tomato Sauce
10/13/14 06:57 PM
It's been my goal not to be outdone by anything "store-bought," but when it comes to pizza, it has been really hard to contend with Stuc's Pizza in Appleton, WI. Whenever I'd get a "tastes like Stuc's" comment from one of the kids, I knew I was on the right track. What makes that sauce so unique, so bright red and flavorful, so that "more is better" and it's hard to stop eating even when the belly has had enough?
Well, I think I've finally got something so close that it can be called "homemade Stuc's," and the best part about it is it's also the easiest of all the methods that I've tried to date. This is a simple, extremely flexible way to preserve tomatoes that will fit into anyone's busy fall schedules. Put the tomatoes aside until you're ready to process them, without losing any of the "fresh-picked" flavor and goodness. This sauce has a perky, sweet salty flavor that is reminiscent of fruit leather with a hint of cherry.
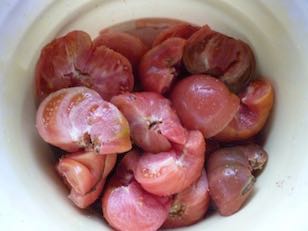
Step 1: Get a clean bucket with a tight fitting lid, some "Real" salt, or pickling salt, and the freshest, ripest, highest quality tomatoes you can find. Wash, trim and slice the tomatoes in ½ and put in the bucket, sprinkling a handful of salt for every gallon of tomatoes. Cover tightly and set aside for at least 4 days, and up to a few weeks. If you need a longer storage time, they can last several months, even up to a year, in a cool temp, but the resulting sauce won't be quite as fresh tasting. You can add tomatoes to the bucket as they come in, but don't forget to add extra salt as well.

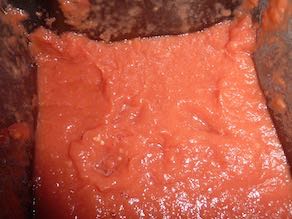
Step 2: When ready to process, strain off the liquid. Bottle the liquid and use it in soups or drink it. Stack tomatoes on a broiler pan, with slats for drainage and a pan underneath to catch the liquid. Bake at 200F for 4-½-5 hrs. Carefully remove from the oven and pour liquid into a bowl, again, reserving for future use in soups. Blend pulp, seeds, skin and all in a Vita-Mix or Champ and there you have it, delicious tomato paste!! Alternatively, you could process through a food mill.
At this point, you can either:
-Freeze it in freezer bags or plastic containers.
-Ferment it according to Weston-Price type recipes, i.e., adding a few tablespoons of whey per quart, and this could be done while processing if you choose this option, then leave at room temp for a few days before putting into storage.
-Refrigerate and use within a couple of weeks.
-Process according to traditional canning recipes.
OR
EDIT: This method will require you to reduce the liquid enough that the sauce doesn't ferment in storage. Aim for a 20% total reduction in liquid, i.e., 5 gallons of whole tomatoes becomes 1 gallon of sauce. You get a greater reduction by increasing the fermenting time to at least 2 weeks and by longer baking.
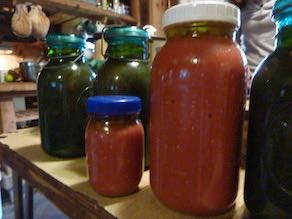
The larger jars in the above batch showed signs of fermentation after 4 days, with a clear liquid settling out in the bottom of the jars, and the tops bulging through the olive oil. If this wasn't checked, a thick cheese-like plug would have formed on top, and the bottom would have become fermented, still good but not as tasty and sweet. It can be remediated by adding sweetener and combining with a more flavorful sauce, but it's not ideal and should be avoided. The good news is that if it does start to ferment, you can quickly salvage by straining the sauce through a cheesecloth, hanging for an hour or so until clear liquid stops dripping steadily, and then spreading pulp on a stainless steel sheet and baking slowly at 180-200 for an hour or more. (You may save yourself some hassle by doing this before attempting to store.) Also, the smaller the jars the less likely you'll have a problem. Check to see that the olive oil is undisturbed on top of the jars every few days for the first couple of weeks of storage.
This is a bit saltier than most sauces, so you may want to reduce salt in recipes when using the sauce.
For pizza sauce, I added freshly grated garlic, Spanish thyme and Fennel and used immediately.


Here's lunch, a piece of leftover pizza with a freshly picked garden salad, made with savoy cabbage, red cabbage, arugula, daikon radishes, cucumbers, tomatoes, and topped with homemade French dressing. Mmm, smells like Stuc's, Mom!!
Well, I think I've finally got something so close that it can be called "homemade Stuc's," and the best part about it is it's also the easiest of all the methods that I've tried to date. This is a simple, extremely flexible way to preserve tomatoes that will fit into anyone's busy fall schedules. Put the tomatoes aside until you're ready to process them, without losing any of the "fresh-picked" flavor and goodness. This sauce has a perky, sweet salty flavor that is reminiscent of fruit leather with a hint of cherry.
Step 1: Get a clean bucket with a tight fitting lid, some "Real" salt, or pickling salt, and the freshest, ripest, highest quality tomatoes you can find. Wash, trim and slice the tomatoes in ½ and put in the bucket, sprinkling a handful of salt for every gallon of tomatoes. Cover tightly and set aside for at least 4 days, and up to a few weeks. If you need a longer storage time, they can last several months, even up to a year, in a cool temp, but the resulting sauce won't be quite as fresh tasting. You can add tomatoes to the bucket as they come in, but don't forget to add extra salt as well.
Step 2: When ready to process, strain off the liquid. Bottle the liquid and use it in soups or drink it. Stack tomatoes on a broiler pan, with slats for drainage and a pan underneath to catch the liquid. Bake at 200F for 4-½-5 hrs. Carefully remove from the oven and pour liquid into a bowl, again, reserving for future use in soups. Blend pulp, seeds, skin and all in a Vita-Mix or Champ and there you have it, delicious tomato paste!! Alternatively, you could process through a food mill.
At this point, you can either:
-Freeze it in freezer bags or plastic containers.
-Ferment it according to Weston-Price type recipes, i.e., adding a few tablespoons of whey per quart, and this could be done while processing if you choose this option, then leave at room temp for a few days before putting into storage.
-Refrigerate and use within a couple of weeks.
-Process according to traditional canning recipes.
OR
EDIT: This method will require you to reduce the liquid enough that the sauce doesn't ferment in storage. Aim for a 20% total reduction in liquid, i.e., 5 gallons of whole tomatoes becomes 1 gallon of sauce. You get a greater reduction by increasing the fermenting time to at least 2 weeks and by longer baking.
The larger jars in the above batch showed signs of fermentation after 4 days, with a clear liquid settling out in the bottom of the jars, and the tops bulging through the olive oil. If this wasn't checked, a thick cheese-like plug would have formed on top, and the bottom would have become fermented, still good but not as tasty and sweet. It can be remediated by adding sweetener and combining with a more flavorful sauce, but it's not ideal and should be avoided. The good news is that if it does start to ferment, you can quickly salvage by straining the sauce through a cheesecloth, hanging for an hour or so until clear liquid stops dripping steadily, and then spreading pulp on a stainless steel sheet and baking slowly at 180-200 for an hour or more. (You may save yourself some hassle by doing this before attempting to store.) Also, the smaller the jars the less likely you'll have a problem. Check to see that the olive oil is undisturbed on top of the jars every few days for the first couple of weeks of storage.
This is a bit saltier than most sauces, so you may want to reduce salt in recipes when using the sauce.
For pizza sauce, I added freshly grated garlic, Spanish thyme and Fennel and used immediately.
Here's lunch, a piece of leftover pizza with a freshly picked garden salad, made with savoy cabbage, red cabbage, arugula, daikon radishes, cucumbers, tomatoes, and topped with homemade French dressing. Mmm, smells like Stuc's, Mom!!
Comments
EM Rinse Hair Color
10/30/13 03:04 PM


Look at what EM's have done for my hair!!
The photo on the left was taken in March of this year, when I started to notice a richer color in my hair as a result of using our Luv'n Life Soap and drinking polypore tea. I may have also used EM with polypore as a rinse at this time.. not sure exactly about the timing of that. Anyway, I've noticed a slow increase in color over the months, and then decided to try my Black Walnut Hull EM as a rinse... wow!! Not only did the color of my hair return almost to the color of my youth, but it's nearly as soft as it once was!! I want my dh to try it, but he thinks he's earned his silver and is not sure he wants to relinquish it. Note, the picture was taken after using the rinse 4 times over the course of 5 days, but the color pretty much changed with the first rinse.
Just for comparison's sake, I've looked into using henna as a natural hair dye and it imparts a much deeper red than this, unless it's combined with other herbs, in which case it goes darker. You have to mix the henna the night before using, than leave it on for several hours, taking extreme care not to stain skin, sink, floor, etc., and rinsing it out sounds like an ordeal. In contrast, I simply poured about ½ cup of my Black Walnut EM on my wet, just shampooed hair as a rinse, quickly rinsing it out... no mess, no fuss, no staining, no waiting... voila!! An added bonus is that this makes the best conditioner I've ever used!!
If you want to try this yourself (I'm not guaranteeing anything, this is extremely experimental!!, but please share your results if you do!!), I have instructions for the way I brew EM's here, and then I simply fill a bucket with black walnuts and either cover them with AEM (activated EM's), or brew the EM's on the black walnuts by adding molasses, EM starter and possibly some wheat bran, good salt and whatever other herbs/clays/minerals catch my fancy at the moment). A similar method could work with polypore mushrooms or any of the herbs that are typically used for dyes, and might work with kombucha as well as EM... experiment at your own risk, but please share!! (You might want to test possible brews with hair clippings first.)
Goumi Berries
10/17/13 03:15 PM
Just had to share how pleased I am with our goumi bushes. The goumi is a relative of the cardinal autumn olive, which in some areas is considered an invasive pest. It's a beautiful nitrogen fixing bush, extracting nitrogen from the air and fixing it in the soil surrounding the plant through special bacteria in its roots. It's a favorite of permaculture/biodynamic/forest gardeners. I bought 10 small bushes 3 years ago for only $25 (it's hard to find such a deal these days, and I notice that my original source no longer supplies them), and they quickly grew into these beauties:
While they produced a few berries last year, which my then 9 yr old son proclaimed to be delicious, this is the first year of true bounty. The fun part about these berries is that they're ripening when everything else is dying off, and for those of us who like to snack while we garden, that's extremely important. Some of us enjoy big handfuls of these whenever we pass by (others wrinkle their noses at their tartness/astringency, which they say goes away when they're fully ripe). Perhaps ours aren't fully there yet, but we're enjoying them anyway, as are the birds, which seem particularly plentiful this year.
No one has to tell me that these have special nutrients that my body is craving, as I can sense the antioxidants and essential fatty acids, especially when blended into the creamiest ever kefir yogurt. There must be some polysaccharides in these babies, as something is turning this kefir into a smooth, delicious treat. Mixed with a handful of frozen strawberries, a scoop of honey and a tsp of konjac (not really necessary, as the goumi berries thicken this up nicely), this is the tastiest yogurt ever, and quite possibly the prettiest (ok, it's a little rustic in that there are some small fibers from the seeds, the pickier amongst us will sieve this before serving, but I like a little extra fiber).
So there you have it, an inexpensive, easy to grow, beautiful, life giving and productive bush to grace the homestead!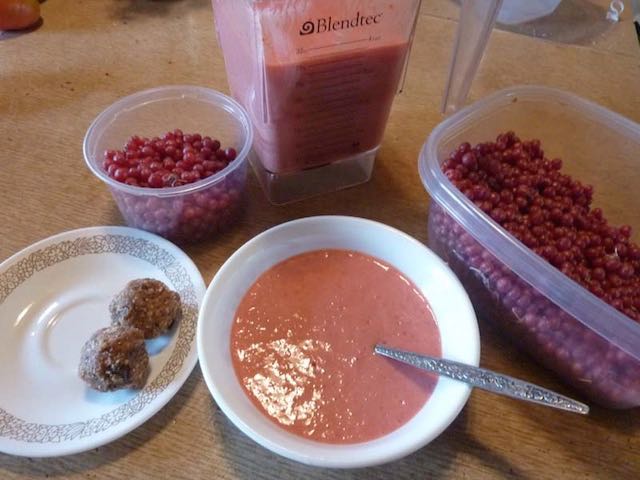
Brewing Polypore "Root Beer"
03/29/13 06:56 PM
Ok, we're talking serious spring fever here! Snow's melting, sap's flowing and sun is SHINING!!!!! What an awesome day to be ALIVE!!!!
Now, when the sun is shining, the last thing I feel like doing is drinking hot tea. It's now time for sparkling, throat tickling SODA! But I still love my shrooms and they still love me, and the awesome thing is that we have discovered a wonderful way to enjoy each other in intimacy, while keeping it cool. Sorry, sun's getting to me.
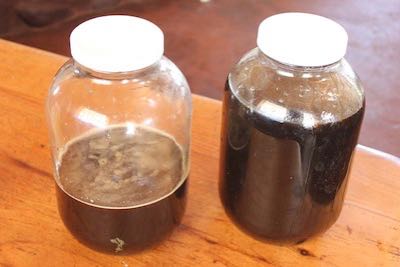
OK, couldn't be more simple. I have a stockpot full of polypores that I brew continuously, taking from as needed. Every couple of days, I strain out a gallon and add it to approximately and on the generous side of 1/4 c. molasses and 3/4 c. honey with a tsp of ginger powder. I leave some air space as shown in the jar on the right, and brew until it's starting to look fizzy as shown on the left, unless I get impatient and drink some early. I never measure such things as molasses and honey because they're a terrible mess to put into measuring cups and you really can't go wrong. Adjust it as you go along, it's very forgiving and will comply to your wishes. Sometimes I add a little of a previous batch to the next batch… seems like it might help speed things up. Takes about 4-5 days to start to get fizzy. That's why I always keep another jar in the queue. Don't tell your family about it or you'll have to make bucketsful. Plastic lids are nice because they allow fizz to build up without exploding… don't try this with a tight fitting lid and definitely keep a very close eye on it.
Check out my Homemade Soda Recipes article for more soda ideas.

Now, when the sun is shining, the last thing I feel like doing is drinking hot tea. It's now time for sparkling, throat tickling SODA! But I still love my shrooms and they still love me, and the awesome thing is that we have discovered a wonderful way to enjoy each other in intimacy, while keeping it cool. Sorry, sun's getting to me.
OK, couldn't be more simple. I have a stockpot full of polypores that I brew continuously, taking from as needed. Every couple of days, I strain out a gallon and add it to approximately and on the generous side of 1/4 c. molasses and 3/4 c. honey with a tsp of ginger powder. I leave some air space as shown in the jar on the right, and brew until it's starting to look fizzy as shown on the left, unless I get impatient and drink some early. I never measure such things as molasses and honey because they're a terrible mess to put into measuring cups and you really can't go wrong. Adjust it as you go along, it's very forgiving and will comply to your wishes. Sometimes I add a little of a previous batch to the next batch… seems like it might help speed things up. Takes about 4-5 days to start to get fizzy. That's why I always keep another jar in the queue. Don't tell your family about it or you'll have to make bucketsful.
Check out my Homemade Soda Recipes article for more soda ideas.
Sourdough Bread in a Clay Baker
03/26/13 09:23 PM
We've been baking sourdough bread to feed our large family for the past 8 years, with some attempts prior to that. I am always looking for the easiest way to do things, but not at the sacrifice of nutrition or taste. Interestingly enough, and as nature would have it, it always works out in the end that the simplest methods are truly the most satisfying, the tastiest and the most nutritious, and that certainly plays out here.
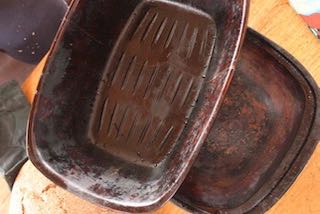
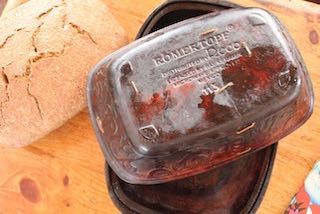
To get right to the point, it's all in the cooking utensil, a clay baker. You might not appreciate at first glance just what a difference this will make, but there are several reasons why this is really what makes or breaks this process. First, clay makes everything taste better. You wouldn't think it is so if you haven't experienced cooking outside of your electric oven, but if you've ever had bread cooked in a wood stove, you know there's a big difference. Even the smell of the bread is noticeably better. But, a wood stove isn't the ultimate… a clay oven is. We made one of those one summer, and baked the most incredible breads and pizza in it, but simple it was not. It took 2 hours of constantly stoking a hot fire, and then carefully cleaning out all the charcoal and hot coals, before a person could bake. So, a romertopf clay baker simplifies things a lot, while giving a very authentic clay baked flavor and texture.
The other thing that makes the baker so simple is that you don't have to bother with a second rise. I set the bread dough up at night, and sometime mid-morning the next day, I grease my romertopf (just the bottom), roll the dough a bit and shape into a loaf, and flip it into the romertopf. I then slit the top several times with a knife, cover it, put the pan in the oven and jack the temp up to as high as it will go, 500 or so F. That's another thing that I learned when cooking in the outdoor clay oven… super hot temps make the bread puff up the best and give the nicest crusts.
You are not supposed to put a cold clay baker into a hot oven, so I don't turn the oven on until the baker is in the oven. Also, you should soak the baker in water for 10 mins prior to us if you haven't used it in a few days or more. I almost never bother with that step since I use mine so frequently. I figure it doesn't have a chance to fully dry out.
If my oven is already hot because of something else cooking in there previously and I don't want to cool it down, I just set the baker with the bread in it on the back of the oven to warm up a bit before putting it in the oven.
So, once the bread's in the oven, the only thing you have to do is wait until you smell it getting done. I often turn it down to 325-375 after 20 mins or so of baking, but I almost just as often forget to do that and it really won't affect the end results. It's very hard to ruin anything cooking in a clay baker. On average, a big loaf will take approximately 1-1/2 hours. I leave the lid on the whole time, and I often leave it in the oven with the lid on to cool down. This will keep the crust soft. For a crunchier crust, take it out when it's hot.
So, is that the simplest way of making sourdough bread you've heard of yet? I can guarantee you that it's the tastiest as well… this bread doesn't hang around here for long, but, if ever I have leftover crumbs, they find their way into cheesecake crust, meat loaf, croutons or stuffing… nothing goes to waste!
Oh, and if you're put off by the price, these are something that will come up for the thrifty. They're often at rummage sales or thrift stores, or can be found on craig's list or even e-bay. Mine both came from thrift stores for about $4 each. The best part for me is that I can make clay pottery from my own soil, and that's what I hope to do this summer. We've made test pottery and it works quite well. I figure I'll have one step ahead if I already know how to cook in it. BTW, if you want to check these out on Amazon, here's the link
… there are various sizes.
And one other note for the thrifty, yes, these do break, as mine did, only because I was doing something stupid, making gravy in the bottom at too high a temp over a burner. The good news was that I simply turn the pot upside down and was able to use it with the broken side as the lid, fitting together the 2, and eventually 3 and finally 4 pieces. When it got to 4 pieces, my ingenious son had mercy on me and followed this pretty simple method of stapling it together, which actually works quite nicely.
I should also add that I never cook meat in anything but clay since discovering this. Besides the romertopf, I also use lead free clay pot liners for cooking small amounts of meat for, say, a stir fry, right on the burner at a low temp, with another clay pot liner to cover. These are cheap and rarely break if temps are moderate to low flame on a gas range. The meat stays juicy and is very hard to ruin.. the longer you cook it, the more tender it gets. A friend checked out the Deroma brand about 4 years ago and they said it was lead free, no glaze.. just terra cotta.
With the clay bakers, even tough old roosters get tender, and every roast seems to be the best I ever made. Honestly, my cooking has gone from great to fabulous with my roaster, if I do say so myself.
PS I just found this cool site that has more info about clay pots, with different types of pots for sale.
And if you're looking for a basic sourdough recipe, care of starters, and other starter ideas check out my web page.
To get right to the point, it's all in the cooking utensil, a clay baker. You might not appreciate at first glance just what a difference this will make, but there are several reasons why this is really what makes or breaks this process. First, clay makes everything taste better. You wouldn't think it is so if you haven't experienced cooking outside of your electric oven, but if you've ever had bread cooked in a wood stove, you know there's a big difference. Even the smell of the bread is noticeably better. But, a wood stove isn't the ultimate… a clay oven is. We made one of those one summer, and baked the most incredible breads and pizza in it, but simple it was not. It took 2 hours of constantly stoking a hot fire, and then carefully cleaning out all the charcoal and hot coals, before a person could bake. So, a romertopf clay baker simplifies things a lot, while giving a very authentic clay baked flavor and texture.
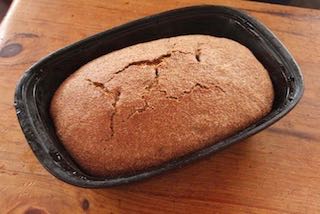
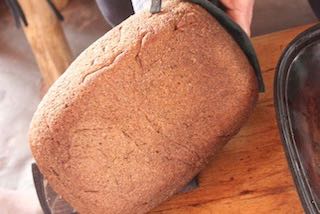
The other thing that makes the baker so simple is that you don't have to bother with a second rise. I set the bread dough up at night, and sometime mid-morning the next day, I grease my romertopf (just the bottom), roll the dough a bit and shape into a loaf, and flip it into the romertopf. I then slit the top several times with a knife, cover it, put the pan in the oven and jack the temp up to as high as it will go, 500 or so F. That's another thing that I learned when cooking in the outdoor clay oven… super hot temps make the bread puff up the best and give the nicest crusts.
You are not supposed to put a cold clay baker into a hot oven, so I don't turn the oven on until the baker is in the oven. Also, you should soak the baker in water for 10 mins prior to us if you haven't used it in a few days or more. I almost never bother with that step since I use mine so frequently. I figure it doesn't have a chance to fully dry out.
If my oven is already hot because of something else cooking in there previously and I don't want to cool it down, I just set the baker with the bread in it on the back of the oven to warm up a bit before putting it in the oven.
So, once the bread's in the oven, the only thing you have to do is wait until you smell it getting done. I often turn it down to 325-375 after 20 mins or so of baking, but I almost just as often forget to do that and it really won't affect the end results. It's very hard to ruin anything cooking in a clay baker. On average, a big loaf will take approximately 1-1/2 hours. I leave the lid on the whole time, and I often leave it in the oven with the lid on to cool down. This will keep the crust soft. For a crunchier crust, take it out when it's hot.
So, is that the simplest way of making sourdough bread you've heard of yet? I can guarantee you that it's the tastiest as well… this bread doesn't hang around here for long, but, if ever I have leftover crumbs, they find their way into cheesecake crust, meat loaf, croutons or stuffing… nothing goes to waste!
Oh, and if you're put off by the price, these are something that will come up for the thrifty. They're often at rummage sales or thrift stores, or can be found on craig's list or even e-bay. Mine both came from thrift stores for about $4 each. The best part for me is that I can make clay pottery from my own soil, and that's what I hope to do this summer. We've made test pottery and it works quite well. I figure I'll have one step ahead if I already know how to cook in it. BTW, if you want to check these out on Amazon, here's the link
… there are various sizes.
And one other note for the thrifty, yes, these do break, as mine did, only because I was doing something stupid, making gravy in the bottom at too high a temp over a burner. The good news was that I simply turn the pot upside down and was able to use it with the broken side as the lid, fitting together the 2, and eventually 3 and finally 4 pieces. When it got to 4 pieces, my ingenious son had mercy on me and followed this pretty simple method of stapling it together, which actually works quite nicely.
I should also add that I never cook meat in anything but clay since discovering this. Besides the romertopf, I also use lead free clay pot liners for cooking small amounts of meat for, say, a stir fry, right on the burner at a low temp, with another clay pot liner to cover. These are cheap and rarely break if temps are moderate to low flame on a gas range. The meat stays juicy and is very hard to ruin.. the longer you cook it, the more tender it gets. A friend checked out the Deroma brand about 4 years ago and they said it was lead free, no glaze.. just terra cotta.
With the clay bakers, even tough old roosters get tender, and every roast seems to be the best I ever made. Honestly, my cooking has gone from great to fabulous with my roaster, if I do say so myself.
PS I just found this cool site that has more info about clay pots, with different types of pots for sale.
And if you're looking for a basic sourdough recipe, care of starters, and other starter ideas check out my web page.